5.4.7. Week 5 Hands-On: HPC Fundamentals — Slurm, Modules, and Storage#
5.4.7.1. Overview#
Today you will practice the core HPC skills you will use for the rest of the semester:
Understand the HPC file systems (home vs project vs scratch) and what belongs where.
Inspect hardware and environment (CPU/RAM, node types, partitions).
Use the module system to load compilers / MPI / chemistry codes / Python stacks.
Run jobs with Slurm:
interactive jobs (
salloc,srun)batch jobs (
sbatch)monitoring and accounting (
squeue,sacct)canceling / troubleshooting (
scancel, common failure modes)
Best practices for reproducibility and performance (job scripts, environment capture, I/O hygiene).
At the end there is a short graded activity you will turn in.
Important: Most code cells below contain commands you should run in a terminal on pete (or a Jupyter terminal on pete).
If you copy/paste, read the comments first and adapt paths/partition names to your account.
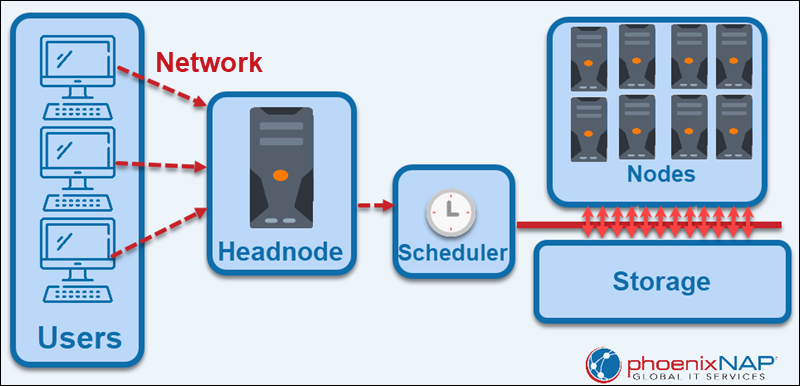
5.4.7.2. 1. HPC Architecture#
Most High Performance Computing (HPC) systems, or clusters, are setup with a specific architecture. A headnode, or login node, is the computer that users log into. The headnode is used almost solely for logging in, creating file structures, and minor tweaking of input files. The major computation is done on compute nodes that are connected to the headnode. Compute nodes are solely for running computation. They are basically standalone computers with the sole purpose of running extensive simulations.
The headnode controls compute nodes through a piece of software called the queueing system or scheduler. On Pete, the queueing system is called slurm. Each job on an HPC system is submitted to the queueing system and then resources (compute nodes) are assigned to the submitted jobs as need be. So, a job request must specicify information like how long it will take, what type of hardware is needed, and how much memory is needed.
Compute nodes are not alsways identical. They can differ by the hardware they have available on them. Often, similar compute nodes are grouped into what is called a partition. Pete has partitions for GPUs, large memory, and different CPUs.
5.4.7.3. 2. Storage & Filesystems: Home vs Scratch (and Why You Should Care)#
On most clusters you will see at least two important areas:
Home (
$HOME)
Backed up (sometimes), quota-limited, good for: source code, small inputs, scripts, notebooks, results you want to keep.Scratch (
$SCRATCHor/scratch/$USER/...)
Fast and designed for heavy I/O, good for: trajectories, temporary simulation files, large outputs.
Often not backed up and may be purged after some number of days.Projects (This is somewhat specific to pete)
You don’t get these automatically - but these are reasonably fast but also large longterm storage. Large jobs should still be run on scratch and transerred to projects as need be.
5.4.7.3.1. Quick checks#
Run the commands below and write down:
your
$HOMEpathyour scratch path (if defined)
your current quotas (if available)
5.4.7.3.2. Where not to run big jobs#
Do not run long computations on the login node.
Use Slurm (interactive or batch) so that your job lands on compute nodes.
Also: avoid writing huge files into $HOME. Put large I/O in scratch.
5.4.7.3.3. Create a scratch work folder#
If $SCRATCH is set, do this:
5.4.7.3.4. Best practice pattern (very common)#
Keep your job script in your home directory tree
In the job script, create a unique run directory in scratch, e.g.
$SCRATCH/week5/run_$SLURM_JOB_ID
Copy needed input files from home → scratch
Run in scratch
Copy final results back scratch → home
5.4.7.4. 3. Hardware Architecture & Node Types#
Before requesting resources, it helps to know what the cluster offers.
5.4.7.4.1. Inspect the login node (just for information)#
This tells you about the machine you are currently on (often a login node):
5.4.7.4.2. What compute nodes exist? (Slurm partitions)#
Slurm groups nodes into partitions (sometimes called “queues”).
Use sinfo to see partitions, node states, and time limits:
Write down at least two partition names you see (e.g., bigmem, cascadelake, bullet, etc.).
You will use them in the graded activity.
5.4.7.5. 4. Environment Modules (and Why module load Matters)#
Clusters typically manage software using Environment Modules (or Lmod).
A module adjusts your PATH, LD_LIBRARY_PATH, etc., so you can access a consistent toolchain.
5.4.7.5.1. Common module commands#
5.4.7.5.2. Loading a module#
Try loading a Python module (names vary by cluster):
If the exact module name differs, use
module avail/module spiderto find the right one.
5.4.7.5.3. Reproducibility tip#
In job scripts, always record your environment at the top:
module purgemodule load ...module listpython --version,which python, etc.
That way you can reproduce runs later.
5.4.7.6. 5. Slurm Basics:#
You do not “run on the cluster”; you request resources from Slurm.
Slurm decides where/when your job runs based on availability and policies.
Key vocabulary:
job: a request to run something
partition: a queue / group of nodes
node: a compute machine
task: a process (often
MPI rank)CPU per task: threads for that process
time limit: maximum runtime you request
5.4.7.6.1. Your most-used commands#
squeue -u $USER: see your jobssbatch job.slurm: submit a batch jobsacct -j <jobid> --format=...: see finished job infoscancel <jobid>: cancel a job
5.4.7.7. 6. Interactive Jobs (Good for Testing)#
Interactive jobs are great for:
testing imports / small scripts
debugging before a longer
sbatchquick visualization on compute nodes
Two common patterns:
5.4.7.7.1. Allocate then run#
salloc [job resource request]then
srun [command(s)]
If you do an interactive allocation, remember to exit when done:
scancel [job id]
This releases resources for others.
5.4.7.8. 7. Batch Jobs with sbatch: A Minimal Working Example#
We will run a simple Python calculation under Slurm and capture:
which node it ran on
how long it took
memory usage (via Slurm accounting)
5.4.7.8.1. 7.1 Create a job script#
In /projects/tia001/$USER/week5, create a file named hello_slurm.slurm.
5.4.7.8.2. 7.2 Submit the job#
Submit the above script:
5.4.7.8.3. 7.3 Inspect output#
When the job finishes, you should see files like:
hello_slurm_<jobid>.outhello_slurm_<jobid>.err
View them:
5.4.7.9. 8. Job Accounting (sacct) and Common Failure Modes#
5.4.7.9.1. 8.1 sacct basics#
After a job finishes, Slurm can report runtime, memory, exit code, etc.
5.4.7.9.2. 8.2 Common failure modes to recognize#
PartitionTimeLimit: you requested more time than the partition allowsQOSMaxWallDurationPerJobLimit: similar, but policy/QoS enforcedOUT_OF_MEMORY/OOM: your job exceeded requested memoryCANCELLED: you (or admin) cancelled itFAILED: non-zero exit code or node failure
Best practice: if a job dies, first check:
the
.errfilethe last ~20 lines of
.outsacctfor State/ExitCode
5.4.7.10. 9. Job Arrays (Running Many Similar Jobs)#
Job arrays are ideal when you have many independent calculations (e.g., scanning dihedral angles, running multiple replicas).
Example idea: run 10 short tasks with different random seeds.
If you submit an array, you will see multiple tasks under one job allocation ID.
Use squeue -u $USER to monitor them.
5.4.8. Graded Activity (Turn In)#
Goal: demonstrate you can (1) identify cluster partitions, (2) submit a Slurm batch job that runs on a compute node, and (3) retrieve accounting information.
5.4.8.1. What to turn in#
Create a folder named /projects/tia001/$USER/week5 containing:
activity_job.slurm— your batch scriptactivity_job.out— the Slurm output file from your run (rename it)activity_sacct.txt— a text file containing thesacctline(s) for your jobanswers.txt— short answers to the questions below
5.4.8.2. Step A. Partition scavenger hunt (answers go in answers.txt)#
List two partition names on the cluster.
For one of those partitions, what is the maximum time limit (walltime) shown by
sinfo?
Helpful commands:
sinfo
sinfo -o "%P %a %l %D %t %N"
5.4.8.3. Step B. Run a real Slurm job#
Write activity_job.slurm that:
requests 1 node, 1 task, 1 CPU
requests 1–2 GB memory
requests ≤ 5 minutes walltime
runs on a real partition on pete
creates a scratch run directory (if scratch is available)
runs the Monte Carlo pi code (or any small Python compute)
copies the final output back to your home folder
You may adapt hello_slurm.slurm from above.
Submit:
sbatch activity_job.slurm
Check the status and record the jobid for later use:
squeue -u $USER
When it finishes, rename your output file to activity_job.out.
5.4.8.4. Step C. Accounting#
Use sacct to record job accounting information in activity_sacct.txt:
Elapsed time
MaxRSS (maximum memory)
State and ExitCode
Example:
sacct -j <jobid> --format=JobID,JobName%20,State,ExitCode,Elapsed,MaxRSS,AllocCPUS,ReqMem
5.4.8.5. Minimal grading checklist (10 pts)#
(2)
answers.txthas correct partition names + one time limit(4)
activity_job.slurmis valid, requests reasonable resources, and runs on compute nodes(2)
activity_job.outshows node name + pi estimate(2)
activity_sacct.txtincludes the requested fields for your job
5.4.8.6. Optional (Nice-to-know) Extras#
If time allows, explore one or two of these and jot notes for yourself:
scontrol show job <jobid>(very detailed job info)seff <jobid>(if installed; summarizes efficiency)ulimit -a(limits)environment capture:
env | sort > env_<jobid>.txtpip freeze/conda env export